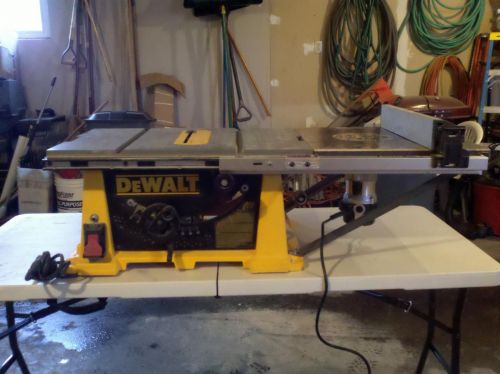
A router table + router went ahead deal locally, so I lifted
it up yet hadn’t foreseen exactly how much room it would take up on my
workbench. My table saw has an expansion that was not so much doing something
besides enabling me to cut enormous stock. Fortunately (because I didn’t gauge
it ahead of time), the router table I purchased was a decent size match, thus I
manufactured a casing to house it, disposed of the legs that accompanied the
table, and popped it set up. It works like nothing else - it made it simple to
make a hammer, for instance.
Measure and Cut Frame
Measure the size of the gap in the table expansion and the size of the table.
For me, the measurements were 687*370 mm and 605*363 mm, separately. That
implied I expected to expand the table by 41 mm at each end, yet didn’t have to
do anything on the sides except for offer help. So I made an edge by cutting
two long thin pieces 22*38*687 mm and two short fat pieces 34*41*370 mm
and removing a discount toward the part of the arrangement the end pieces with
the end goal that the edge was 44 mm high and the thin pieces were actually 18
mm smaller than the fat pieces.
Apparatuses and Materials
If you got this far, without a doubt you claim a table saw. For this venture,
you need a full-size one with an expansion - mine is the Ridgid R4512, which is
likely the most moderate one of this sort out there. You will likewise require
a smaller than expected router table, of the sort planned to be
mounted on a workbench. The one I purchased accompanied a fixed base
router and every one fitting.
Collect
I stuck and screwed the edge together, set up it and acknowledged I expected to
cut a refund for the switch and openings on each end for the sliding miter
check. I did the previous with a jigsaw and the last with the table saw, at
that point fixed the edge set up using level head fastens the gaps were at that
point there.
At long last It’s Done!
Drill openings and drive screws through the edge into the underside of the
table to fix it set up (I used 6) and mount your router. The manner in which I
set this up I can either use the fence that accompanied the router or the fence
on the table checked whether I have to defeat a bigger workpiece. This
router/table arrangement accompanied a switch that powers the router, LED
lights in the router, and your shopvac
whenever associated. The entire arrangement works pleasantly, and it was only a
snappy activity. Incredible spot to put a router table occupying no more space
in your shop - I can at present hide the table saw under my workbench (see last
picture), which is significant given my shop is simply ~1/3 of a carport.

 Flag Writing