
Finest Hour Of Video Frames
A Story by dw817
 I have been needing a tool that would allow me to view full-screen any frame of any video that was written with any compressor.
This article covers the download and usage of such a tool that I use.

PRESS CTRL = (EQUALS) TO INCREASE THE PAGE SIZE AND CTRL 0 (ZERO) TO RESET THE PAGE SIZE

THE FINEST HOUR
of viewing video frames
An article on viewing any frame in any video
© February 2023 Written by David Wicker
Please do not reprint without permission
There are a great many video players and video editors out there. And sadly today, even fewer free or ones that are especially simple to understand - let alone if you just want to view the full screen of a video frame per frame, forwards, or backwards, or play it back at an unstaggering smaller or faster rate.
Because very often I like to do this especially if the video is old and rare, and with the incredibly limited choices of complete Freeware I have only come across one in my time that works efficiently and effectively.

And that is VirtualDUB.
It is a unique and free video editor written by Avery Lee back for Windows 95 back in 1998. And while it was not originally designed to just examine videos frames, it does a superb great job of this and far surpasses any other free video players and editors I have found that can do the same.
One of the problems, however, is that it can only load a single video extension, "AVI" as it is an incredibly old program.
Fortunately this was remedied when "VirtualDUB Mod" written by Shekhjkl took Avery's original code and added the ability to load MPEG videos by creating a plugin for it. From this branch other video-codecs were permitted to be read and viewed and interpreted directly from the "plugins32" directory.
You will need this program VirtualDUB2 to start with along with my plugins, so go to download the single self-extracting package I put together from HERE:
https://www.mediafire.com/file/73jla6nwtxqae01/dw817's+VirtualDUB2+Pack+02-18-23.exe/file
If you want just the compressed ZIP version which is the same package with a ZIP extension, you can find that HERE:
https://www.mediafire.com/file/3gmflhvvgetiy95/dw817's+VirtualDUB2+Pack+02-18-23.zip/file
However to unpack a .ZIP file you will also need to install 7zip if you have not already done so. That can be found HERE:
https://www.7-zip.org/
Be aware included is every single VirtualDUB video filter and file extension interpreter I have collected over a period of many years, several of which no longer even exist on the internet. These filters not only let you make visual changes to your video but also allow you to load any of these file extensions:
AVI, MPG, MPEG, MPE, Mp2, Mp4, M4P, M4V, MPV, MKV, MOV, QT, WMV, WebM, OGV, DiVX, XVID, FLV, SWF, GIF, and even a series of separate image frames if you so choose.
So spread this package freely ! Especially for those who want a relatively simple frame-view any video file, either forwards or backwards and by playback frame rate adjustment.
Once downloaded, Run or unpack it to your choice of directory.
Now run "virtualdub.exe"
You will be presented with this screen.

Once up select VIEW from the menu and PANE LAYOUT and OUTPUT PANE ONLY.
Also make sure that ENABLE OUTPUT PANE is selected or you won't see anything !
Under the VIDEO menu, make sure FULL PROCESSING MODE is selected. Not DIRECT STREAM COPY.
Go now to load up the sample video I have included called, "Big Buck Bunny Trailer" or a different video you already have. The one I have included one here is poor quality as I did not want to make this a big download for you. Just something to experiment with.

The original video is called, "Big Buck Bunny" a video that is freely distributable you can view the same trailer for it HERE in much higher quality:
https://www.youtube.com/watch?v=yUQM7H4Swgw
To download other versions of this same video, or the full video, go HERE:
https://peach.blender.org/download/
It is a video that is intentionally designed to test video codecs, to see how well they can compress and at what quality level. If you're seriously interested in video compression, check out H265 for the very BEST in video compression today. 2023.
https://en.wikipedia.org/wiki/High_Efficiency_Video_Coding
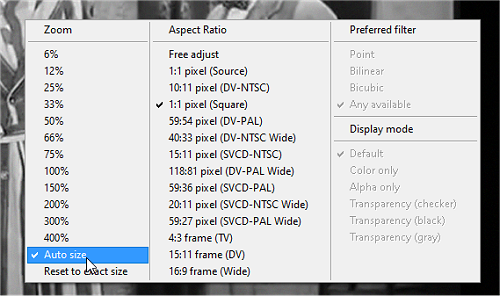
Once you have a video loaded, right-click on the picture itself and select AUTO SIZE so the video will always vertically appear on this screen fully expanded or shrunk to fit each time.
You can also fiddle with the ASPECT RATIO, however for most videos I would think you would want to keep it at 1:1 PIXEL SOURCE.
To view your video full-screen, select from VIEW the option FULL SCREEN and you should now be able to only see the video. Press the ESC key to return back.
If at any time your video is playing and you don't want it to, press ESC and SPACEBAR. This can happen if you accidentally press ENTER all by itself.
The following keystrokes control your video, either in full-screen mode or not.
* = shift ^ = ctrl
LEFT ARROW : Go back one frame, can be slow with big video.
RIGHT ARROW : Go forward one frame.
*LEFT ARROW : Go back to previous keyframe.
*RIGHT ARROW: Go forward to next keyframe.
PAGE UP : Go backwards 50 frames, can be slow with big video.
PAGE DOWN : Go forwards 50 frames, can be slow with big video.
^LEFT : Go to the very first video frame.
^RIGHT : Go to the very last video frame.
HOME : Mark this as the beginning frame.
END : Mark this as the end frame. DEL : Delete all the frames between beginning and ending frame. ^D : Clear the frame selection, not the video frames just the range.
^Z : This will undo the last frames you deleted or changed.
SPACEBAR : Play without filters. Also stops any mode of playing.
ENTER : Play the video with filters. This is for normal playing.
UP or DOWN : these keys do not do anything.
Now if you want to stop here, you can. Just load any video you want and use VIEW and FULL SCREEN to view your video.
. . .
However if you want greater control and to ensure your video is not too tall for the screen each time, read on.
To make FULL SCREEN a keyboard option like ALT-ENTER, then from the menu select OPTIONS and KEYBOARD SHORTCUTS. You will be presented with this screen:
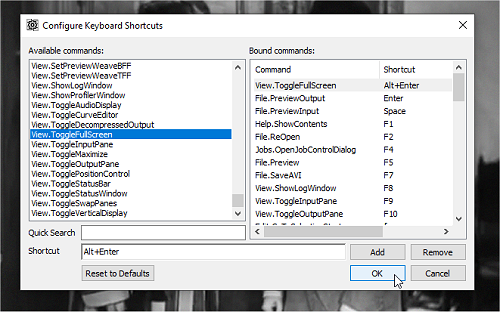
Use the left scroll-bar and scroll all the way down until you can see, "View.ToggleFullScreen."
Click on that. Click the mouse in the SHORTCUT field and press ALT-ENTER together. Select the button ADD. Then OK and now you can simply press ALT+ENTER to view your video full-screen without having to go to the menu.
Not all videos will look great if it scrolls off the screen as you may have discovered so you may need to resize them with filters.
If you check VIDEO and FILTERS, here you can add filters to make the video more presentable.
As many of the videos I have are smaller than my initial screen size, I normally use 3 filters.
1. [RESIZE]
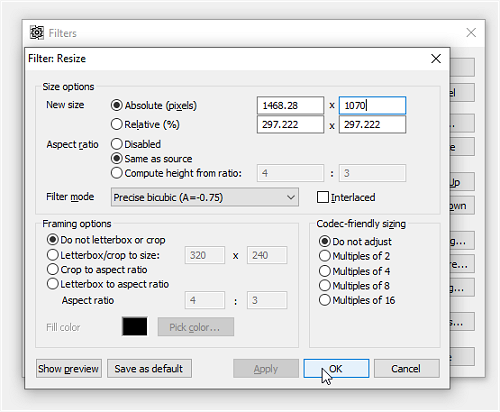 Precise Bicubic, Absolute pixels, where vertical size is 1070, or whatever the maximum size pixels of your screen is down minus 10-pixels. Make sure it's 10 minus the actual size. Don't worry about the horizontal size. It will change according to the proportion of your video and the vertical size down you have chosen.
You can use Lanczos if you like, however I have found for enlarging smaller videos, Bicubic gives you a nice bit of blur that blends out some of the blocks you see in low compression videos.
Now every time you load a video, always make sure this is set to 1070 (or whatever the vertical size of your screen is). Ignore the horizontal size as that is always calculated according to the proportion of your original video and the vertical height you set.
2. [CANVAS SIZE]
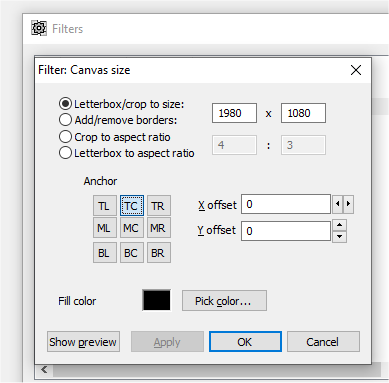
Width of 1980 or really the number of pixels you have across on your screen, and Height of 1080 (or +10 of what you used above) using the [TC] upper center box to center it from the top center, not the exact center.
This is helpful so when you go full-screen you can see that there are 10-pixels not being used at the bottom of the screen. You can use your mouse to confirm this. Now if you do NOT have these 10-pixels of free space, then it means the video you are viewing is scrolling off the edge of the screen vertically and you need to go back to the first filter and change it back to 1070.
Unfortunately every time you load a new video with a new number of pixels down, the value for the first filter of resize will shift and it's up to you to change it back to 1070 or whatever the vertical size of your screen is minus 10-pixels.
Many small videos look pretty bad without a bit of ambient noise, so here I also add:
3. [ADD NOISE]
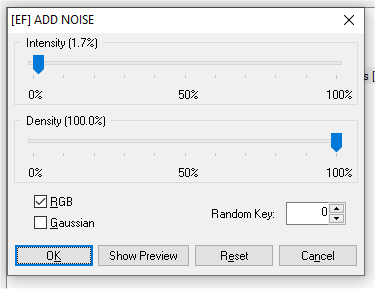
Intensity=1.7%. Density=100%. RGB is checkmarked. Gaussian is OFF. Add more noise if you like though I have found 1.7% to be quite satisfactory.
Now when you view your videos, especially if they are smaller, they will look better having resized to the proper horizontal and vertical size and you have added a tiny bit of noise to them to cover up ugly compression blocks that may have been recorded earlier into the video.
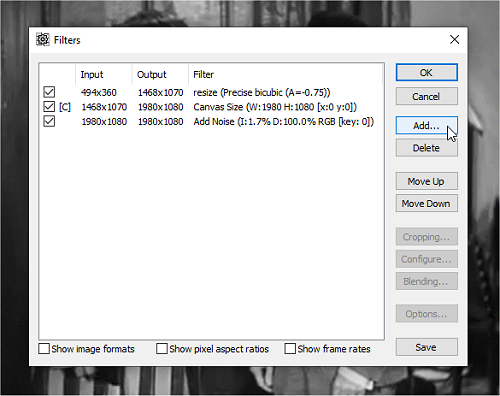
And that's it ! Those are the primary 3-filters I use to view frames in videos.
If the picture is too bright or too dark, try out the Filter Brightness/Contrast. Fiddle with these values until you get a more presentable picture.
If the picture has too much color or not enough, try out the Filter Saturation. It defaults to 100%. You can shift that to 75% for less color and 125% for more. Also most filters let you PREVIEW so you can fine-tune the values you want for them.
If your video has a large amount of static on it, try out the DYNAMIC NOISE REDUCTION (MMX) which will cut down the static by blending similar pixels.
Filters run in the order they are entered, from top to bottom and you can scroll them up and down using the buttons to the right. For instance, you don't want to add NOISE first as that would appear blocky with small videos. Always save ADD NOISE for your last filter if you want to use it so the noisy pixels are the same size as your actual screen.
As mentioned earlier there are MANY filters here so mix and match as you like.
If you want to play back the video let's say at 5 frames per second, then select from the menu VIDEO and FRAME RATE. Change it from NO CHANGE to CHANGE FRAME RATE TO and put in the white field, 5 or any other number you would like, including faster than the default if you so choose.
Also since you are using the PLAYBACK feature and it is different than its initial frames-per-second recording, go to turn audio OFF by selecting AUDIO, and NO AUDIO.
Press ALT-ENTER or select FULL SCREEN. Then press ENTER to start playing back the video at the frames-per-second rate you entered. Press ESC to exit full-screen and press SPACEBAR to stop the playback.
You can also save your filter selections, audio selection, and frame-rate selection by pressing CTRL+S once you are back to viewing the main video with menus again. Use CTRL+L to load them all back.
If you want to save the current frame as a single seperate image, select from the menu, FILE, EXPORT, and SINGLE IMAGE. BMP, JPG, and PNG are available to save.
While VirtualDUB is in fact a fairly robust video editor, I will not be covering how to use the other functions as the purpose of this whole article was to show how to use it as an effective tool to view videos frame per frame, both forwards and backwards, and to play them at a consistent and non-staggered rated either slower or faster than its initial recording.
And that's it !
. . .
Next time I'll address how to create self-extracting EXE that can contain a whole directory of files without using any commercial tools - and allowing you to upload these to share with your friends on the internet.
If you found this article and bundle helpful, have any questions about it, or have designed a particular useful set of filters that work with most sizes and types of videos, please let me know !
Thanks !
|

| | 
|
© 2023 dw817
|
|
Stats
81 Views
Added on February 19, 2023
Last Updated on February 19, 2023
Tags: davidw, 7zip, AVI, MPG, MPEG, MPE, Mp2, Mp4, M4P, M4V, MPV, MKV, MOV, QT, WMV, WebM, OGV, DiVX, XVID, FLV, SWF, GIF, view frames, video filters, Big Buck Bunny, H265, video compression, video decompression, Freeware, Blender
|


 Flag Writing